As a trusted cloud consulting company, CloudifyOps was approached by a customer seeking a cloud-native solution to enhance security compliance in their AWS environment. The key requirement was to eliminate the use of SSH keys for server access while ensuring all access was fully monitored and auditable.
To address this, the CloudifyOps team implemented two tailored solutions. In our previous blog (Part One), we explored AWS SSM Session Manager as a native, secure alternative. In this follow-up (Part Two), we delve into Teleport, a cloud-agnostic tool that offers secure, identity-based SSH access with robust auditing capabilities—an ideal solution for organizations with hybrid or multi-cloud infrastructures.
As a leading cloud consulting company, our goal is to deliver practical, secure, and scalable solutions that align with modern compliance requirements.
By leveraging cloud DevOps services, businesses can enhance security, streamline access management, and ensure compliance across multi-cloud environments. Teleport provides robust authentication, session recording, and role-based access control, making it an ideal choice for secure and scalable infrastructure management. Stay tuned as we delve into how cloud DevOps services can optimize access control and improve operational efficiency.
Secure access to infrastructure ensures that security compliances are met, with centralized auditing and monitoring to log all activities properly. This enhances infrastructure security in cloud computing, providing better control, transparency, and visibility into who is accessing and modifying servers. By implementing strong access controls and continuous monitoring, organizations can mitigate risks, prevent unauthorized access, and strengthen overall cloud security.
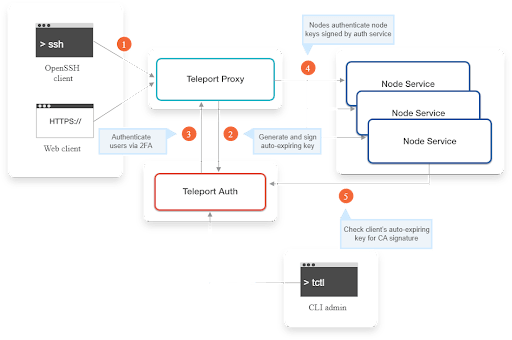
Teleport is a Certificate Authority and an Access Plane for our infrastructure. With Teleport, we can:
Here we are using teleport to secure SSH between Linux machines in the environment.

Prerequisites
We are using RHEL7 as the Teleport server. Download the Teleport binary from the customer portal, and unzip it.
wget https://get.gravitational.com/teleport-ent-v7.2.1-linux-amd64-bin.tar.gz
tar -xzf teleport-ent-v7.2.1-linux-amd64-bin.tar.gz
cd teleport-ent
Copy Teleport and tctl binaries to a bin directory
License file: Download the license file which is in the pem format from the customer portal and paste it in /var/lib/teleport/license.pem.
By configuring Teleport as a SystemD service, we can take advantage of SystemD to manage Teleport’s lifecycle processes such as starting and stopping the service.
sudo vim /etc/systemd/system/teleport.service
[Unit]
Description=Teleport SSH Service
After=network.target
[Service]
Type=simple
Restart=on-failure
EnvironmentFile=-/etc/default/teleport
ExecStart=/usr/local/bin/teleport start –pid-file=/run/teleport.pid
ExecReload=/bin/kill -HUP $MAINPID
PIDFile=/run/teleport.pid
LimitNOFILE=8192
[Install]
WantedBy=multi-user.target
Reload daemon and enable the service.
sudo systemctl daemon-reload
sudo systemctl enable teleport
We can check its status to confirm that Teleport is running properly.
systemctl status teleport
Edit the configuration yaml file
vim /etc/teleport.yaml
teleport:
nodename: teleport.ex001.in
auth_token: f7adb7ccdf0403745trg32ec6010fd6f0caec94ba190v135
auth_servers: [ “localhost:3025” ]
proxy_service:
enabled: true
public_addr: teleport.ex001.in:443
mysql_listen_addr: 0.0.0.0:3036
web_listen_addr: 0.0.0.0:3080
tunnel_listen_addr: 0.0.0.0:3024
auth_service:
enabled: true
cluster_name: teleport.ex001.in
tokens:
– proxy,node:f7adb7ccdf0403745trg32ec6010fd6f0caec94ba190v135
– trusted_cluster:f7adb7ccdf0403745trg32ec6010fd6f0cae
authentication:
second_factor: otp
ssh_service:
enabled: “yes”
For Teleport tctl tool to work properly, we have to give proper permissions to Teleport directory
sudo chmod 755 -R /var/lib/teleport/
Once the above tasks are completed, start Teleport service.
sudo systemctl start teleport
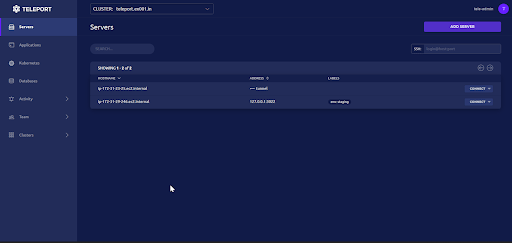
Now we will be able to access the Teleport UI.
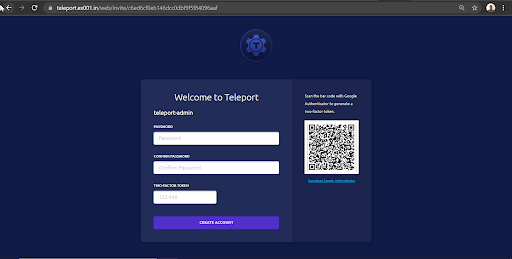
To access Teleport UI, we have to create a Teleport user with proper permissions.
Create a new Teleport user teleport-admin which is allowed to log into SSH hosts as any of the principals root, ubuntu or EC2-user.
Teleport will always enforce the use of two-factor authentication by default. It supports One-Time Passwords (OTP) and hardware tokens (U2F). This quick start will use OTP – you will need an OTP-compatible app that can scan a QR code.
Use the below command.
tctl users add teleport-admin –roles=admin –logins=root,ubuntu,ec2-user
This command will give a URL as an output with a one hour life. Through the URL, we can complete the user creation and multifactor authentication.

Provide password for the user and the OTP from the authenticator app. Everytime we login to Teleport, it will prompt for user password and OTP.
Now we can login to the UI using the user credentials. Once logged in, we can connect to the CLI of all registered nodes through the UI.


Using the terminal, we will be able to perform all the CLI actions on the server.
We can check the status of the Teleport server by using the tctcl status command, it will give us the information on the Teleport server

The CA pin is needed while configuring the nodes.
We configured a strong static token for nodes and apps in the teleport.yaml file. We are going to use this token in this step. First, install Teleport on the target node and configure SystemD in the same way we did for the Teleport server enabling and reloading the daemon. Configure the teleport.yaml file for the Teleport agent as below.
vim /etc/teleport.yaml
teleport:
auth_token: f7adb7ccdf0403745trg32ec6010fd6f0caec94ba190v135
# you can also use auth server’s IP, i.e. “10.1.1.10:3025”
auth_servers: [ “10.101.1.150:3025” ]
# Set the ca_pin value so it can verify the Teleport server
ca_pin:
sha256:78cdce6f5a99e8ff0283aa6adbe7b4fb87d60e11e561e60e65f385ce5951bbc2
# enable ssh service and disable auth and proxy:
ssh_service:
enabled: true
labels:
env: dev
auth_service:
enabled: false
proxy_service:
enabled: false
The ca_pin and the auth token is from the auth server / the Teleport server, which we have configured previously.
Once the configuration is done, start the Teleport service, Teleport will run as a node and will be available in the Teleport server under servers section.

Users and roles are listed under the team section in the Teleport UI. Here we have configured only Teleport local users and configured them with necessary roles. Roles are configured to give different levels of access to different resources. We use labels to control different resources. Labels can be env, team or anything based on the organization’s requirement.
Sample role is given below.
dev role with only access to resources with label dev.
kind: role
metadata:
id: 1634021462483125720
name: dev
spec:
allow:
app_labels:
env: dev
db_labels:
env: dev
db_names:
– ‘{{internal.db_names}}’
db_users:
– ‘{{internal.db_users}}’
kubernetes_groups:
– ‘{{internal.kubernetes_groups}}’
kubernetes_labels:
env: dev
kubernetes_users:
– ‘{{internal.kubernetes_users}}’
logins:
– ‘{{internal.logins}}’
– ubuntu
– ec2-user
node_labels:
env: dev
rules:
– resources:
– role
verbs:
– list
– create
– read
– update
– delete
– resources:
– auth_connector
verbs:
– list
– create
– read
– update
– delete
– resources:
– session
verbs:
– list
– read
– resources:
– event
verbs:
– list
– read
– resources:
– user
verbs:
– list
– create
– read
– update
– delete
– resources:
– token
verbs:
– list
– create
– read
– update
– delete
– resources:
– lock
verbs:
– list
– create
– read
– update
– delete
deny: {}
options:
cert_format: standard
enhanced_recording:
– command
– network
forward_agent: true
max_session_ttl: 30h0m0s
port_forwarding: true
version: v3
This role gives access to the resources with label env:dev and the user will have a session ttl of 30h.
Teleport has the ability for users to request additional roles. The Access Request API makes it easy to dynamically approve or deny these requests. A user can request or approve an access request once and only if the user has permission. For this, we have defined the following roles.
Access request role:
kind: role
metadata:
id: 1634021882267841227
name: access_request
spec:
allow:
request:
roles:
– editor
– qa
– dev
deny: {}
options:
cert_format: standard
enhanced_recording:
– command
– network
forward_agent: false
max_session_ttl: 30h0m0s
port_forwarding: true
version: v4
This role allows a user to request access for dev, editor and qa roles with a ttl of 30 hrs.
Access request approve role :
kind: role
metadata:
id: 1634021977059094158
name: ar_admin
spec:
allow:
app_labels:
‘*’: ‘*’
db_labels:
‘*’: ‘*’
kubernetes_labels:
‘*’: ‘*’
review_requests:
roles:
– dev
– qa
– editor
rules:
– resources:
– access_request
verbs:
– list
– read
– update
– delete
– resources:
– review
verbs:
– author
– review
deny: {}
options:
cert_format: standard
enhanced_recording:
– command
– network
forward_agent: false
max_session_ttl: 30h0m0s
port_forwarding: true
version: v3
This allows the user to approve access requests for qa, dev and editor. The user can raise an access request from the activity tab in the Teleport UI.


Once the request is raised, the admin/user with the access approves the role from the same activity tab.

Teleport to Slack integration notifies individuals and channels of Access Requests. As a prerequisite, we need an app in Slack configured for Teleport and a channel which the Teleport bot can access. Check official documentation for configuring the app in Slack.
Export access-plugin certificate using tctl tool
tctl auth sign –format=tls –user=access-plugin –out=auth –ttl=2190h
The above sequence should result in three PEM encoded files being generated: auth.crt, auth.key, and auth.cas (certificate, private key, and CA certs respectively). We’ll reference the auth.crt, auth.key, and auth.cas files later when configuring the plugins.
Install the Teleport-Slack plugin
curl -L https://get.gravitational.com/teleport-access-slack-v7.3.0-linux-amd64-bin.tar.gz
tar -xzf teleport-access-slack-v7.3.0-linux-amd64-bin.tar.gz
cd teleport-access-slack
./install
teleport-slack configure > teleport-slack.toml
sudo mv teleport-slack.toml /etc
Edit the teleport-slack.toml file
vim /etc/teleport-slack.toml
# example Slack plugin configuration TOML file
[teleport]
addr = “auth.example.com:3025” # Teleport Auth Server GRPC API address
client_key = “/var/lib/teleport/plugins/slack/auth.key” # Teleport GRPC client secret key
client_crt = “/var/lib/teleport/plugins/slack/auth.crt” # Teleport GRPC client certificate
root_cas = “/var/lib/teleport/plugins/slack/auth.cas” # Teleport cluster CA certs
[slack]
token = “xoxb-11xx” # Slack Bot OAuth token
# Optional Slack Rooms
recipients = [“team”,”devops”]
[log]
output = “stderr” # Logger output. Could be “stdout”, “stderr” or “/var/lib/teleport/slack.log”
severity = “INFO” # Logger severity. Could be “INFO”, “ERROR”, “DEBUG” or “WARN”.
Enable SystemD for Teleport-Slack
sudo vim /etc/systemd/system/teleport-slack.service
[Unit]
Description=Teleport Slack Plugin
After=network.target
[Service]
Type=simple
Restart=on-failure
ExecStart=/usr/local/bin/teleport-slack start –config=/etc/teleport-slack.toml
ExecReload=/bin/kill -HUP $MAINPID
PIDFile=/run/teleport-slack.pid
[Install]
WantedBy=multi-user.target
Enable and start the service
systemctl enable teleport-slack
systemctl start teleport-slack
Once we start the service, whenever an access request is raised, we will get a notification in our Slack channel.

We can click on the link to be redirected to the access request approval UI of the Teleport server. Once the request is approved or denied, we will get a reply in the thread from the Teleport bot.

TSH is a Teleport client tool. It helps us log into Teleport clusters and obtain short-lived credentials. It can also be used to list servers, applications, and Kubernetes clusters registered with Teleport.
Teleport provides a secure login to its cluster using the TSH tool. Use the following command to login
tsh login –proxy=teleport.example.com –user=teleport-admin
This will prompt for the user password and OTP.

Once logged in, we can list the nodes in the Teleport cluster using the TSH LS command
tsh status
tsh ls
tsh ssh root@node-name
Follow us on our LinkedIn Page. To explore our services, visit our website.
CloudifyOps Pvt Ltd, Ground Floor, Block C, DSR Techno Cube, Survey No.68, Varthur Rd, Thubarahalli, Bengaluru, Karnataka 560066
CloudifyOps Pvt Ltd, Cove Offices OMR, 10th Floor, Prince Infocity 1, Old Mahabalipuram Road, 50,1st Street, Kandhanchavadi, Perungudi, Chennai, Tamil Nadu - 600096
CloudifyOps Inc.,
200, Continental Dr Suite 401,
Newark, Delaware 19713,
United States of America
Copyright 2024 CloudifyOps. All Rights Reserved
