Automating repeated tasks in a scheduled manner is also known for so-called cron jobs. It helps in reducing resource costs, maintaining system availability, and removing manual workloads efficiently over time.
In this article, we will walk you through the steps for creating a simple scheduled task using Amazon CloudWatch and AWS Lambda. By leveraging cloud consulting services and AWS managed services, businesses can streamline automation, enhance scalability, and ensure efficient cloud operations with minimal manual intervention.
There are two AWS resources involved in building the scheduled task:
Every morning, our cloud engineer sends a report to managers about the Performance Analysis. Technically, what he will do is call an API endpoint that will fetch data from a database and perform some data transformation to produce the reporting analysis. Once the process is done, he will send the generated report to the managers through email. He needs to do this every morning at 8:00 AM GMT+8.
We can see that sending email notifications to the managers in the morning can be automated by creating a scheduled task.
The diagram below shows how it can be done on AWS.
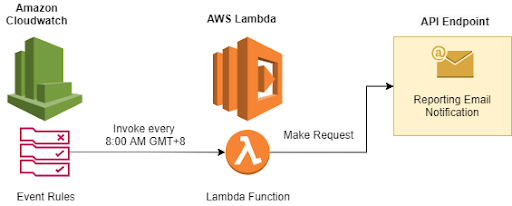
Let’s break down the above process flow:
Now, let’s get into setting up this scheduled task pipeline on AWS.
Go to AWS Management Console and log in using your AWS Account. Then, proceed to AWS Lambda in the console and click on the Create function.

Choose ’author from scratch’ and define your function name. In this tutorial, we will be creating a Python function. Thus, select Python 3.7 as runtime.
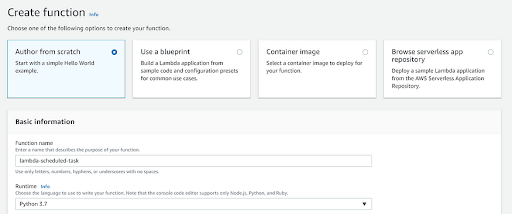
You will need to choose or create an execution role before creating the function. Once it is done, click on the Create function.
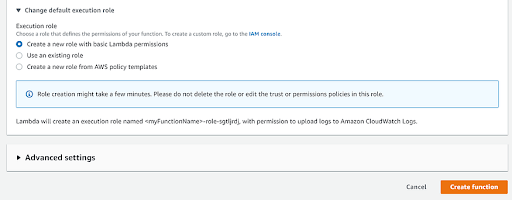
Once done, we can see our function created.

import boto3
from datetime import datetime, timedelta
def lambda_handler(event, context):
    # Set your S3 bucket name and the number of days to retain logs
    bucket_name = "your-s3-bucket-name"
    retention_days = 30
    # Initialize the S3 client
    s3_client = boto3.client('s3')
    # Calculate the date before which logs should be deleted
    deletion_date = datetime.now() - timedelta(days=retention_days)
    # List objects in the S3 bucket
    objects = s3_client.list_objects_v2(Bucket=bucket_name)
    if 'Contents' in objects:
        for obj in objects['Contents']:
            # Get the object key (filename) and last modified date
            obj_key = obj['Key']
            last_modified = obj['LastModified']
            # Check if the object is a log and is older than the deletion date
            if obj_key.endswith('.log') and last_modified < deletion_date:
                # Delete the log object
                s3_client.delete_object(Bucket=bucket_name, Key=obj_key)
                print(f"Deleted: s3://{bucket_name}/{obj_key}")
    return {
        'statusCode': 200,
        'body': 'Log rotation and deletion complete'
    }
Click on Deploy once you have completed the code. It is done! Let’s create an Amazon CloudWatch Event to trigger this Lambda function on a timely basis.
Go to the AWS Management Console and log in using your AWS Account. Proceed to Amazon CloudWatch and click Rules under the event section in the left navigation menu. We will see the Events list and then click on Create Rule.
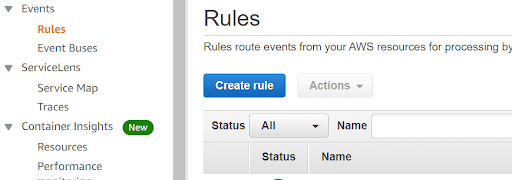
In the ‘create rule’ page, the Event pattern is selected by default in the event source section. We wish to create scheduled events, therefore we need to select the Schedule option. When we select the Schedule Option, we see there are two kinds of event rules that we can define:
For a fixed rate, we need to define the interval and its unit. The units are minutes, hours, and days.
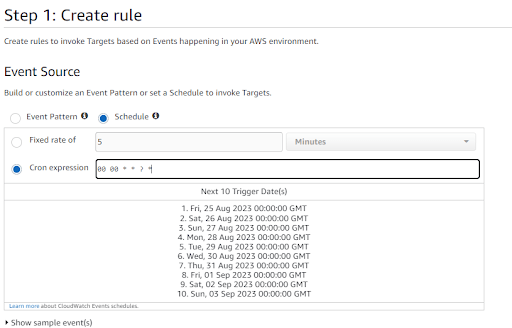
In our case, let’s define our schedule event rule using the cron expression. A cron expression is a string composed of 6 or 7 fields separated by white spaces. The cron expression field can consist of any of the allowed values, together with various combinations of the allowed special characters for that field.
We will define our expression that will trigger the event every day at 8:00 AM GMT+8 time zone. This is how the cron expression will look like. We can construct a very detailed schedule of events using the cron expression and depending on how intricate the use case that we are working on at the moment.
Click on the Add target and we will see that the Lambda function is selected by default. Now, select the function that will be our target and for this example, we will select the lambda-scheduled-task function we created earlier.
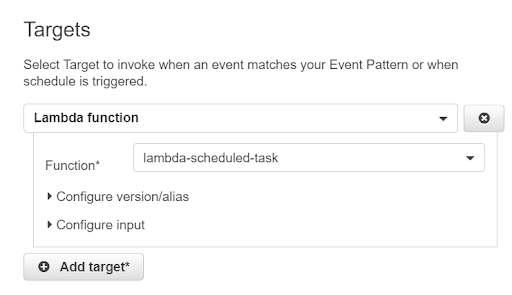
Click on Configure details once everything is done.
We need to provide a name and description for our event rule. Make sure that Enabled is checked and click on Create Rule.
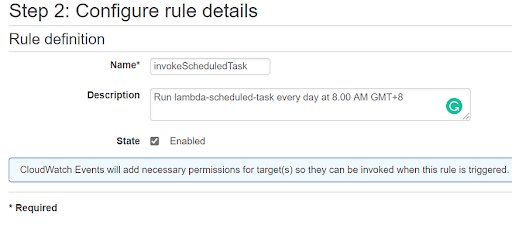
The event rule will be created and we will be redirected to the Rules list page. From here, we can see that our scheduled event is successfully created.

Now this event will be triggered every day at 8:00 AM in GMT+8 and it will also trigger our Lambda function accordingly.
In this article, we discussed the related components for scheduled tasks on AWS, how to create and configure the Lambda function, and how to create scheduled event rules using Amazon CloudWatch Event. We hope this article will help you build customized scheduled tasks on AWS.
To know more about how the CloudifyOps team can support you in your cloud journey, write to us at sales@cloudifyops.com.
CloudifyOps Pvt Ltd, Ground Floor, Block C, DSR Techno Cube, Survey No.68, Varthur Rd, Thubarahalli, Bengaluru, Karnataka 560066
CloudifyOps Pvt Ltd, Cove Offices OMR, 10th Floor, Prince Infocity 1, Old Mahabalipuram Road, 50,1st Street, Kandhanchavadi, Perungudi, Chennai, Tamil Nadu - 600096
CloudifyOps Inc.,
200, Continental Dr Suite 401,
Newark, Delaware 19713,
United States of America
Copyright 2025 CloudifyOps. All Rights Reserved
