Our customer, with infrastructure on EKS set up by the CloudifyOps team, had a fluctuating load on worker nodes. The cluster was provisioned to meet the peak load and was largely under-utilized during off-peak hours, incurring costs to the customer. The EKS cluster had 2 node groups that needed a scaling solution to scale the node groups independently. With the growth in their business, the customer was concerned about the latency and availability of their services.
In today’s dynamic cloud environment, scaling Kubernetes clusters to meet varying workload demands is a critical challenge for cloud engineers. While Kubernetes offers built-in scaling capabilities, there are situations where more advanced auto-scaling solutions are needed.
Our solution was to leverage Karpenter and the scaling solutions it offers. This blog takes you through the steps involved in setting up Karpenter and testing it.
Why do we need Karpenter and its Custom Resource Definitions(CRD)? Aren’t the built-in Kubernetes auto-scaling solutions enough?
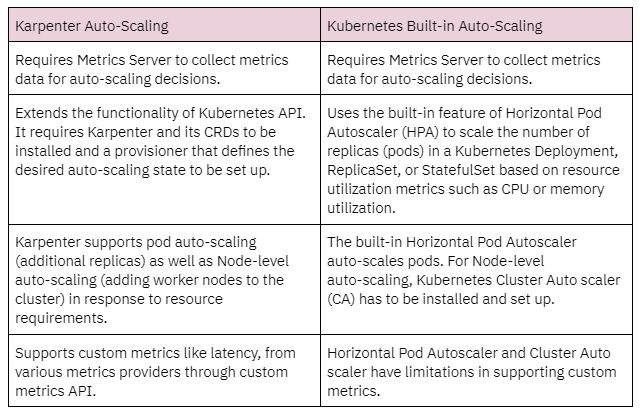
To better understand Karpenter auto-scaling, let us compare the built-in auto-scaling solutions from Kubernetes against the auto-scaling features of Karpenter.

Karpenter provides definite advantages when the problem involved auto-scaling the worker nodes and supporting custom metrics.
With its dynamic capacity provisioning, Karpenter allowed us to save infrastructure costs (up to 30%), reduce the downtime (up to 80%), reduce manual intervention, and achieve improvement in resource utilization and workload distribution (up to 25%), by using the advanced customization features for our client. In addition, it also provided our client an option for auto-scaling based on custom metrics.
The below steps to setup Karpenter are specific to the version v0.27.0. Since newer versions of Karpenter are released regularly, the install/upgrade steps could differ from those below. Please check the official documentation for the latest version and installation steps. Karpenter should be set up after creating the EKS cluster.
The IAM permissions and roles required by Karpenter are as below:
CLUSTER_NAME=my-eks-cluster
AWS_PARTITION=”aws” # if you are using standard partitions
AWS_REGION=”us-east-1″
OIDC_ENDPOINT=”$(aws eks describe-cluster — name ${CLUSTER_NAME}
— query “cluster.identity.oidc.issuer” — output text)”
AWS_ACCOUNT_ID=$(aws sts get-caller-identity — query ‘Account’ — output text)
echo ‘{
“Version”: “2012–10–17”,
“Statement”: [
{
“Effect”: “Allow”,
“Principal”: {
“Service”: “ec2.amazonaws.com”
},
“Action”: “sts:AssumeRole”
}
]
}’ > node-trust-policy.json
aws iam create-role — role-name “KarpenterNodeRole-${CLUSTER_NAME}”
— assume-role-policy-document file://node-trust-policy.json
aws iam attach-role-policy — role-name “KarpenterNodeRole-${CLUSTER_NAME}”
— policy-arn arn:aws:iam::aws:policy/AmazonEKSWorkerNodePolicy
aws iam attach-role-policy — role-name “KarpenterNodeRole-${CLUSTER_NAME}”
— policy-arn arn:aws:iam::aws:policy/AmazonEKS_CNI_Policy
aws iam attach-role-policy — role-name “KarpenterNodeRole-${CLUSTER_NAME}”
— policy-arn arn:aws:iam::aws:policy/AmazonEC2ContainerRegistryReadOnly
aws iam attach-role-policy — role-name “KarpenterNodeRole-${CLUSTER_NAME}”
— policy-arn arn:aws:iam::aws:policy/AmazonSSMManagedInstanceCore
aws iam create-instance-profile
— instance-profile-name “KarpenterNodeInstanceProfile-${CLUSTER_NAME}”
aws iam add-role-to-instance-profile
— instance-profile-name “KarpenterNodeInstanceProfile-${CLUSTER_NAME}”
— role-name “KarpenterNodeRole-${CLUSTER_NAME}”
cat << EOF > controller-trust-policy.json
{
“Version”: “2012–10–17”,
“Statement”: [
{
“Effect”: “Allow”,
“Principal”: {
“Federated”: “arn:aws:iam::${AWS_ACCOUNT_ID}:oidc-provider/${OIDC_ENDPOINT#*//}”
},
“Action”: “sts:AssumeRoleWithWebIdentity”,
“Condition”: {
“StringEquals”: {
“${OIDC_ENDPOINT#*//}:aud”: “sts.amazonaws.com”,
“${OIDC_ENDPOINT#*//}:sub”: “system:serviceaccount:karpenter:karpenter”
}
}
}
]
}
EOF
aws iam create-role — role-name KarpenterControllerRole-${CLUSTER_NAME}
— assume-role-policy-document file://controller-trust-policy.json
cat << EOF > controller-policy.json
{
“Statement”: [
{
“Action”: [
“ssm:GetParameter”,
“ec2:DescribeImages”,
“ec2:RunInstances”,
“ec2:DescribeSubnets”,
“ec2:DescribeSecurityGroups”,
“ec2:DescribeLaunchTemplates”,
“ec2:DescribeInstances”,
“ec2:DescribeInstanceTypes”,
“ec2:DescribeInstanceTypeOfferings”,
“ec2:DescribeAvailabilityZones”,
“ec2:DeleteLaunchTemplate”,
“ec2:CreateTags”,
“ec2:CreateLaunchTemplate”,
“ec2:CreateFleet”,
“ec2:DescribeSpotPriceHistory”,
“pricing:GetProducts”
],
“Effect”: “Allow”,
“Resource”: “*”,
“Sid”: “Karpenter”
},
{
“Action”: “ec2:TerminateInstances”,
“Condition”: {
“StringLike”: {
“ec2:ResourceTag/karpenter.sh/provisioner-name”: “*”
}
},
“Effect”: “Allow”,
“Resource”: “*”,
“Sid”: “ConditionalEC2Termination”
},
{
“Effect”: “Allow”,
“Action”: “iam:PassRole”,
“Resource”: “arn:${AWS_PARTITION}:iam::${AWS_ACCOUNT_ID}:role/KarpenterNodeRole-${CLUSTER_NAME}”,
“Sid”: “PassNodeIAMRole”
},
{
“Effect”: “Allow”,
“Action”: “eks:DescribeCluster”,
“Resource”: “arn:${AWS_PARTITION}:eks:${AWS_REGION}:${AWS_ACCOUNT_ID}:cluster/${CLUSTER_NAME}”,
“Sid”: “EKSClusterEndpointLookup”
}
],
“Version”: “2012–10–17”
}
EOF
aws iam put-role-policy — role-name KarpenterControllerRole-${CLUSTER_NAME}
— policy-name KarpenterControllerPolicy-${CLUSTER_NAME}
— policy-document file://controller-policy.json
“Karpenter.sh/discovery” = “my-eks-cluster”
This tag will also be added to the provisioner file later, so Karpenter knows the subnets and security groups to use for the instances it spins up.
for NODEGROUP in $(aws eks list-nodegroups — cluster-name ${CLUSTER_NAME}
— query ‘nodegroups’ — output text); do aws ec2 create-tags
— tags “Key=karpenter.sh/discovery,Value=${CLUSTER_NAME}”
— resources $(aws eks describe-nodegroup — cluster-name ${CLUSTER_NAME}
— nodegroup-name $NODEGROUP — query ‘nodegroup.subnets’ — output text )
done
NODEGROUP=$(aws eks list-nodegroups — cluster-name ${CLUSTER_NAME}
— query ‘nodegroups[0]’ — output text)
LAUNCH_TEMPLATE=$(aws eks describe-nodegroup — cluster-name ${CLUSTER_NAME}
— nodegroup-name ${NODEGROUP} — query ‘nodegroup.launchTemplate.{id:id,version:version}’
— output text | tr -s “t” “,”)
# If your EKS setup is configured to use only Cluster security group, then please execute –
SECURITY_GROUPS=$(aws eks describe-cluster
— name ${CLUSTER_NAME} — query “cluster.resourcesVpcConfig.clusterSecurityGroupId” — output text)
# If your setup uses the security groups in the Launch template of a managed node group, then:
SECURITY_GROUPS=$(aws ec2 describe-launch-template-versions
— launch-template-id ${LAUNCH_TEMPLATE%,*} — versions ${LAUNCH_TEMPLATE#*,}
— query ‘LaunchTemplateVersions[0].LaunchTemplateData.[NetworkInterfaces[0].Groups||SecurityGroupIds]’
— output text)
aws ec2 create-tags
— tags “Key=karpenter.sh/discovery,Value=${CLUSTER_NAME}”
— resources ${SECURITY_GROUPS}
The steps involved are:
kubectl create ns karpenter
kubectl edit configmap aws-auth -n kube-system
– groups:
– system:bootstrappers
– system:nodes
rolearn: arn:aws:iam::${AWS_ACCOUNT_ID}:role/KarpenterNodeRole-${CLUSTER_NAME}
username: system:node:{{EC2PrivateDNSName}}
export KARPENTER_VERSION=v0.27.0
helm template karpenter oci://public.ecr.aws/karpenter/karpenter — version ${KARPENTER_VERSION} — namespace karpenter
— set settings.aws.defaultInstanceProfile=KarpenterNodeInstanceProfile-${CLUSTER_NAME}
— set settings.aws.clusterName=${CLUSTER_NAME}
— set serviceAccount.annotations.”eks.amazonaws.com/role-arn”=”arn:${AWS_PARTITION}:iam::${AWS_ACCOUNT_ID}:role/KarpenterControllerRole-${CLUSTER_NAME}”
— set controller.resources.requests.cpu=1
— set controller.resources.requests.memory=1Gi
— set controller.resources.limits.cpu=1
— set controller.resources.limits.memory=1Gi > karpenter.yaml
affinity:
nodeAffinity:
requiredDuringSchedulingIgnoredDuringExecution:
nodeSelectorTerms:
— matchExpressions:
— key: karpenter.sh/provisioner-name
operator: DoesNotExist
— matchExpressions:
— key: eks.amazonaws.com/nodegroup
operator: In
values:
— ${NODEGROUP1}
— ${NODEGROUP2}
kubectl create -f https://raw.githubusercontent.com/aws/karpenter/${KARPENTER_VERSION}/pkg/apis/crds/karpenter.sh_provisioners.yaml
kubectl create -f https://raw.githubusercontent.com/aws/karpenter/${KARPENTER_VERSION}/pkg/apis/crds/karpenter.k8s.aws_awsnodetemplates.yaml
kubectl apply -f karpenter.yaml
The 2 yaml CRD files above can be downloaded from the URLs listed below. Modifying the CRDs or customizing CRD files is not recommended by AWS and Karpenter as they are API resource definition files.
aws/karpenter/v0.27.0/pkg/apis/crds/karpenter.sh_provisioners.yaml
aws/karpenter/v0.27.0/pkg/apis/crds/karpenter.k8s.aws_awsnodetemplates.yaml
# This provisioner will provision general-purpose(t3a) instances
apiVersion: karpenter.sh/v1alpha5
kind: Provisioner
metadata:
name: general-purpose
spec:
consolidation:
enabled: true
requirements:
# Include general purpose instance families
— key: karpenter.k8s.aws/instance-family
operator: In
values: [t3a]
# Exclude small instance sizes
— key: karpenter.k8s.aws/instance-size
operator: In
values: [xlarge, medium]
— key: karpenter.sh/capacity-type
operator: In
values: [on-demand]
— key: topology.kubernetes.io/zone
operator: In
values: [us-east-1a, us-east-1b, us-east-1c]
providerRef:
name: default
— –
apiVersion: karpenter.k8s.aws/v1alpha1
kind: AWSNodeTemplate
metadata:
name: default
spec:
subnetSelector:
karpenter.sh/discovery: my-eks-cluster # replace with your cluster name
securityGroupSelector:
karpenter.sh/discovery: my-eks-cluster # replace with your cluster name
detailedMonitoring: true # boolean value
blockDeviceMappings:
— deviceName: /dev/xvda
ebs:
volumeSize: 75Gi
volumeType: gp3
iops: 3000
encrypted: true
kmsKeyID: “arn:aws:kms:us-east-1:xxxxxxxxxxxx:key/14ce1495–9686–4518–9904–159c25608a29”
deleteOnTermination: true
amiSelector:
aws-ids: ami-xxxxxxxxxxxxx
Check the controller logs to confirm there are no errors, and Karpenter creates nodes for the workloads.
kubectl logs -f -n karpenter -c controller -l app.kubernetes.io/name=karpenter
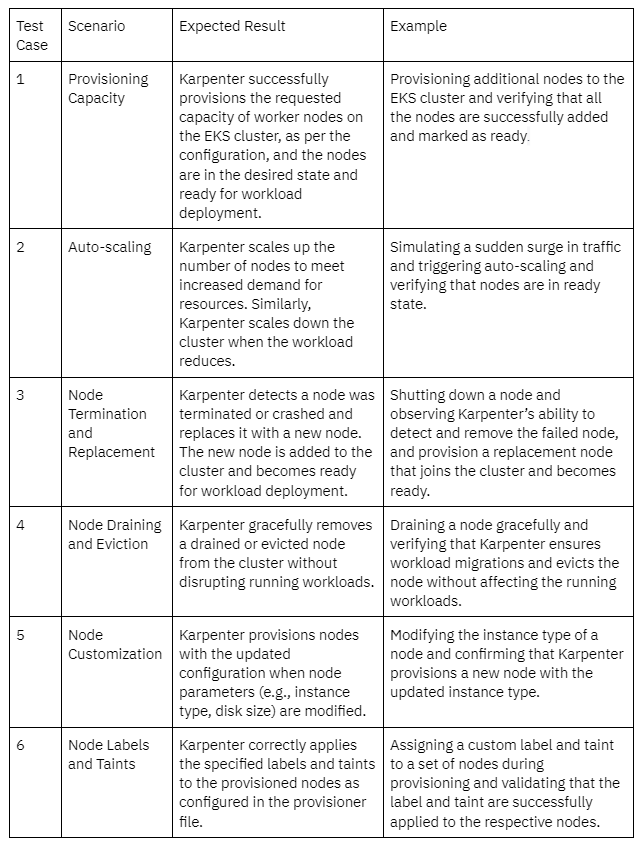
Now to test the Karpenter setup, we created test deployments with replica pods and a higher CPU and memory “requests” parameter. This allows the existing cluster resources to be saturated and Karpenter creates additional worker nodes in response to pods that the Kubernetes scheduler has marked as “unschedulable”. We created additional provisioners to test additional configuration options specified in the provisioner file. The test cases and their results have been captured in the below table.

In conclusion, Karpenter emerges as a powerful and reliable auto scaling solution for managing workloads on Amazon Elastic Kubernetes Service (EKS). Its robust capabilities offer numerous benefits that can be quantified, enhancing the efficiency and scalability of EKS clusters. By leveraging Karpenter, organizations can dynamically provision and scale the underlying infrastructure to match workload demands, resulting in optimized resource utilization and improved application performance.
One of the key advantages of Karpenter is its intelligent capacity provisioning, which helps organizations save infrastructure costs by avoiding underutilization or overprovisioning.
Karpenter enables enhanced reliability and fault tolerance of EKS clusters and ensures the high availability of applications running on them. Furthermore, Karpenter provides advanced features such as node customization, affinity, and anti-affinity rules. These features enable organizations to fine-tune their infrastructure based on specific requirements, resulting in better performance and efficiency. Karpenter also removes any manual intervention and administrative overhead in the auto-scaling process.
By leveraging Karpenter, organizations can unlock the true value of their EKS clusters, drive operational excellence, and deliver exceptional user experiences while achieving tangible measures of cost reduction, scalability improvement, and resource optimization.
CloudifyOps Pvt Ltd, Ground Floor, Block C, DSR Techno Cube, Survey No.68, Varthur Rd, Thubarahalli, Bengaluru, Karnataka 560037
Indiqube Vantage, 3rd Phase, No.1, OMR Service Road, Santhosh Nagar, Kandhanchavadi, Perungudi, Chennai, Tamil Nadu 600096.
CloudifyOps Inc.,
200, Continental Dr Suite 401,
Newark, Delaware 19713,
United States of America
Copyright 2024 CloudifyOps. All Rights Reserved
